

By Larry Barker
In our previous discussions, we explored the use of the Domino Backup service for safeguarding vital Teamstudio product elements, including CIAO! configuration and log files. Building upon this foundation, we're now set to delve deeper into configuring Domino Backup to harness Amazon’s Simple Storage Service (S3) for storing backups. This strategy is crucial for organizations aiming to capitalize on the vast scalability and dependability offered by cloud storage. If you're joining us for the first time, this post extends the concepts we covered earlier about setting up Domino Backups. For a quick recap or to familiarize yourself with the basics, please revisit our earlier post here.
Setup AWS Components
Configuring Domino Backup to use Amazon S3 requires the setup of two crucial AWS components: the AWS Command Line Interface (CLI) and an S3 bucket. Let's break down each component and walk through their setup processes.
Understanding and Installing the AWS CLI
What is AWS CLI?
The AWS Command Line Interface (CLI) is a unified tool that provides direct access to AWS services. It enables you to control multiple AWS services directly from your command line, providing a way to script and automate tasks. This tool is instrumental in creating and managing AWS resources, including S3 buckets.
Installing AWS CLI on Windows
When preparing to use AWS S3 for Domino Backups, it's crucial to install the AWS Command Line Interface (CLI) directly on the Domino server that will be running the backup service. This ensures seamless integration and direct communication between your Domino server and AWS services. The installation process on a Windows-based Domino server is straightforward. Begin by downloading the AWS CLI installer from the official AWS website. During the installation, you will be guided through setting up essential configurations such as selecting a default region and creating access keys, which are necessary for your Domino server to interact effectively with your AWS account. These steps are vital for enabling the Domino Backup service to directly manage and transfer backup data to your S3 bucket. For detailed instructions on the installation and configuration process, refer to the comprehensive AWS CLI Installation Guide.
Creating an S3 Bucket using AWS CLI
What is an S3 Bucket?
Amazon S3 is a scalable and secure object storage service. S3 buckets are fundamental units in S3, acting as containers for your data. Think of them as individual cloud-based drives where you can store and retrieve any amount of data.
Setting Up an S3 Bucket for Domino Backups
Once you've installed AWS CLI, the next step is creating an S3 bucket that will serve as the storage destination for your Domino backups. To do this, open your command prompt or terminal and use the following command:
aws s3 mb s3://dominobackups This command creates a new bucket named 'DominoBackups'. It’s important to ensure that the bucket name is unique across all of your existing bucket names in Amazon S3.
After creating the bucket, you might want to configure additional settings like bucket policies for access control, enable versioning for backup integrity, or set up lifecycle rules for managing backup retention. These configurations can be crucial for maintaining a secure and efficient backup system. For more insights into bucket creation and advanced configurations, explore the S3 Documentation on Creating and Managing Buckets.
Configuring the Domino Backup Service for S3 Integration
Now that our S3 bucket is ready, it's time to configure the Domino Backup service to use this new storage resource. Upon the initial setup of the dominobackup.nsf, the system generates a few default example configurations, as highlighted in our previous article. Our focus will be to modify the platform configuration document, specifically tailoring it for the Windows platform and our AWS S3 bucket.
Creating and Customizing the Windows S3 Configuration Document
The first step involves creating a duplicate of the default Windows configuration document to serve as the basis for our S3 integration. In this document, it’s advisable to change the configuration description to something more descriptive, like 'Windows S3 Config'. This alteration can be made on the Main tab of the configuration document.

Duplicate the default configuration document and update accordingly. Be sure to disable/enable the desired one.
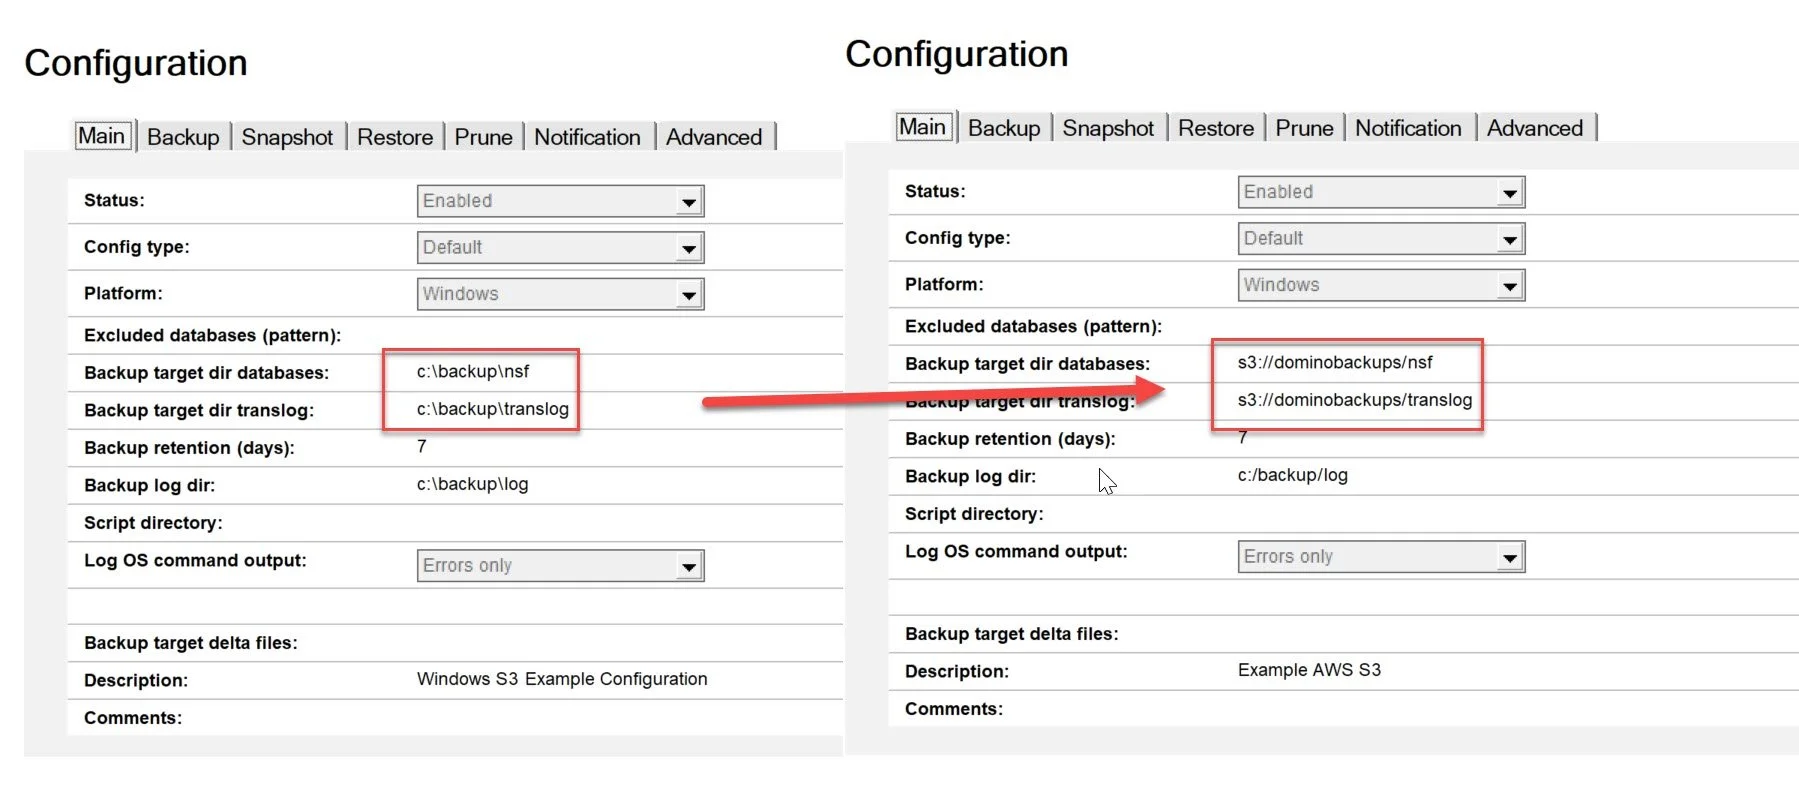
In the process of editing the Main tab, we also have the perfect opportunity to set up the S3 Bucket as the new target directory for both databases and transaction logs. By default, these are initially set to point to local folders:
c:\backup\nsffor databases.c:\backup\translogfor transaction logs.
Our objective is to redirect these paths to their S3 counterparts within our newly created bucket. Following the example bucket name 'dominobackups', we'll adjust these fields to point to the bucket's resource path:
s3://dominobackups/nsffor databases.s3://dominobackups/translogfor transaction logs.
Setting Up and Configuring Command Formulas
Having set up our backup targets, the next critical step involves configuring specific command formulas. These formulas are pivotal in executing backup, restore, or prune activities. You'll find the relevant settings within the platform-specific configuration document, distributed across three distinct tabs.
Configuring the Backup Command Formula
Initially, the default setup for the backup command is tailored to store backups locally, evident in the following default formulas:
Default Backup DB Command:
BackupTargetDir + {\\} + BackupNode + {\\} + BackupMode + {\\} + BackupDateTime + {\\} + FileNameDefault Backup Translog Command:
BackupTargetDir + {\\} + BackupNode + {\\} + BackupReference + {\\} + FileNameThese commands are set to 'File' as the command type. Our goal is to modify them to 'Cmd Formula', allowing us to integrate Domino with AWS CLI commands for S3 backups. This integration will maintain the default folder structure, ensuring that our data sets are stored in their designated paths. The updated formulas, which combine AWS CLI commands with the existing structure, will look something like this:
S3 Backup DB Command:
x:= "/"; q:={"}; "aws s3 cp " + q + PhysicalFileName + q + " " + q + BackupTargetDir + x + BackupNode + x + BackupMode + x + BackupDateTime + x + FileName + q +" --no-progress 2>&1"S3 Backup Translog Command:
x:= "/"; q:={"}; "aws s3 cp " + q + PhysicalFileName + q + " " + q + BackupTargetDir + x + BackupNode + x + BackupReference + x + FileName + q +" --no-progress 2>&1"After updating both fields on the Backup tab of the Windows Configuration document, remember to save your changes. This sets the stage for us to apply similar modifications to the Restore and Prune commands.

Backup tab with updated S3 command formula applied.
Configuring the Restore Command Formula
The process of setting up the restore command formula mirrors our approach with the backup command. Here, our objective is to integrate AWS CLI commands, enhancing the restore functionality with cloud capabilities. This involves updating the 'Restore Db Command' and 'Restore Translog Command'.
As we did with the backup configuration, it's crucial to change the type of both fields from 'File' to 'Cmd Formula'. This modification is key in enabling the command to interact with AWS CLI, particularly for retrieving data from our S3 bucket. The updated formulas, incorporating the AWS CLI S3 copy command, will be structured as follows:
S3 Restore Db Command:
x:= "/"; q:={"}; "aws s3 cp " + q + BackupTargetDir + x + BackupNode + x + BackupMode + x + BackupDateTime + x + FileName + q + " " + q + RestoreFileName + q +" --no-progress 2>&1"S3 Restore Translog Command:
x:= "/"; q:={"}; "aws s3 cp " + q + BackupTargetDir + x + BackupNode + x + BackupReference + x + FileName + q + " " + q + RestoreFileName + q +" --no-progress 2>&1"With these formulas in place, the Domino Backup service is now able to restore data from the S3 bucket. It's essential to review these settings thoroughly after updating to guarantee they align with your specific backup and restore strategy.

Restore tab with updated S3 formula applied.
Finalizing the Setup with the Prune Action Configuration
The last critical step in our setup involves configuring the 'Prune' action to work effectively with our S3 settings. This ensures that the Domino Backup service can manage the deletion of data sets when necessary. At this stage, you should be quite familiar with the process of modifying command formulas. For the Prune action, we'll specifically update the commands related to database and transaction log pruning:
S3 Prune DB Command:
x:= "/"; q:={"}; "aws s3 rm " + q + BackupTargetDir + x + BackupNode + x + BackupMode + x + BackupDateTime + x + FileName + q +" --no-progress 2>&1"S3 Prune Translog Command:
x:= "/"; q:={"}; "aws s3 rm " + q + BackupTargetDir + x + BackupNode + x + BackupReference + x + FileName + q + " --no-progress 2>&1"
Prune command formula with S3 related settings applied.
With these commands in place, your Domino Backup service is now fully equipped to interact with AWS S3 not just for backup and restore, but also for efficient data management through the pruning process.
Exploring Backup Provider Example Configurations
In addition to AWS S3, a range of third-party backup providers can be effectively used with Domino Backup. For those looking to expand their backup solutions, the HCL Open Source Documentation is an invaluable resource. A particularly useful feature provided by HCL is a collection of DXL (Domino XML) configuration examples. These examples serve as practical guides for integrating various backup providers with Domino Backup, significantly easing the learning curve associated with setting up and configuring these services.
These DXL configuration examples are conveniently accessible for download from their GitHub repository. Once you've chosen and downloaded the example that aligns with your needs, importing it into your dominobackup.nsf is a straightforward process. Use the 'Import DXL' option found under the 'Actions' drop-down menu within the dominobackup.nsf.

Importing backup providers DXL examples using the ‘Import DXL’ action.
This simple action leads to the automatic creation of the example configuration document in your dominobackup.nsf, streamlining your setup process. This approach is not just efficient but also ensures a quick and easy way to experiment with and adopt various backup solutions.
As we wrap up this guide on integrating Domino Backup with Amazon S3, it's crucial to highlight an additional benefit for those using Teamstudio CIAO! to manage their Domino development activities. By including Teamstudio CIAO! in your Domino backup routines, not only are you safeguarding your current data, but you're also preserving the complete development history. This integration means that in the event of data loss, you can restore the full development chronicle right in place, ensuring that no aspect of your project's evolution is lost. Furthermore, this protection extends to all Teamstudio products that use templates for their features.
For further insights and advanced configurations, you are encouraged to consult the HCL Open Source Documentation. This additional resource can provide deeper understanding and more sophisticated options for managing your Domino backup environment.